Friday, April 30, 2010

Reason #2

Reason #2 (#1 being to enter our GIVEAWAY) you should visit Get Craftin is because she has some superb tutorials!
I got this cute flower sash idea HERE!  It is such a good idea, so feminine and pretty! I just finished mine today and I LOVE it.  I am definitely going to make more... it really got my creativity flowing. I am in loving all the different flowers. I used a plain old satin ribbon to tack my flowers too and then I can just tie it on! 
So go explore her site when you have some free time! Most of the ideas are simple and cheap to make! Have fun and enjoy!

Tuesday, April 27, 2010

Giveaway is FINALLY here....

Hello friends! I am here with my April giveaway… better late than never!
I am guest posting today at
Just click on the button to visit her blog and you can enter to win Strawberry Shortcake!
Contest ends on May 1st at 11:00 pm!  Hope to see you all over at Get Craftin!

Sunday, April 11, 2010

Cute Covered Notebook Mak N Take

I am in love with these!! They are so darling and fun! I already made 2 for myself… one for hat patterns and another right here on my computer desk for jotting down inspiring ideas when I come across them. I even made a mini one for my little guy to doodle in.
Supplies
• Notebook (I like the composition ones)
• Cereal Box
• Fabric
• Thin Batting
• Glue (I like Tacky Glue)
• Lace, ribbon, felt… whatever you want to use to decorate the front with

Here goes....
1. Open up your notebook on your batting and trace around the entire book. Cut the piece out.
2. Apply glue over the front and back of your notebook and stick your batting on.

3. Now place the notebook (opened) on your fabric (wrong side facing up) and trace around about an inch or so away from the edge… doesn’t have to be perfect. Cut that piece out.
4. Working on one side of your notebook at a time, apply glue all around the edges of your first side. Fold in the corners.

5. CLIP your fabric in the center up to the book.
6. Now you can fold in the rest of the sides. The outside of your book should have a pretty/clean finish now.
7. REPEAT on the other side with gluing, folding in the corners and folding in the rest of the sides.

8. Measure the inside of your notebook about a ½ inch from the edges and cut 2 pieces from your cereal box to fit. I cut mine 7 by 9 inches.
9. Trace around one of your box pieces adding an extra inch or so like you did when you cut out your first fabric piece for the notebook. I used a coordinating fabric. Cut 2, one for each box piece.

10. Glue around the edges of your box piece and fold in the corners (make sure the wrong side of your fabric is facing up).
11. Fold in the rest of the sides and the front side of your piece should be beautiful :) REPEAT for the other box piece.

12. Apply glue all over the back of your box piece and stick it to the inside of your notebook. This will cover up all the ugly fabric edges leaving a clean finish! REPEAT on the other side.
After I finished the steps I put my notebook under a some heavy books for a few hours.

Now you have the notebook finished and ready to decorate!  The possibilities are endless.
This is how I did one of mine....

1. Cut or rip a piece of fabric DOUBLE the length of your notebook (add more if you want it more ruffled) and about 2 inches wide.
2. Sew a gathering stitch down the center of the piece and gather to fit the front of your notebook.
3. Pin a piece of ribbon over your gathering stitch and sew into place turning in the ends of the ribbon so you have a clean finish.

4. Glue your ruffle onto the front of your notebook, I also glued a piece of eyelet trimming down for more cuteness.
After you are done decorating the front place the notebook under something heavy till the glue is dried and everything is tacked on good :)

Wow that is a lot! I hope it all makes sense! Enjoy and have a beautiful Sunday!

Saturday, April 10, 2010

Strawberry Shortcake

Definitely drool worthy… this cutie pie is the newest hat to the shop. Didn’t Melissa do a beautiful job with the photos??!! So pretty!
This hat has a different look too it… it is more intricate than the bow hats. I love the new texture and a cute scalloped edge. It is good to spice things up!
Also I wanted to let you know that every Sunday I am going to have a different item on sale for the week. This week it was “Peachy Keen Daydream”.  Tomorrow I will have something new at a discounted price. 

I am aiming to do at least one "Make N Take" a week so this is coming up in a bit…
Stay tuned :)

Wednesday, April 7, 2010

Boo To You SNOW

Spring where are you!!?? Why is there snow on the ground right now? SO irritated!! Me and my little man want to go outside and play!
The other week when the weather was decent Ryker suggested we go ride a bike or roller-skate. Well, he choose to go roller skating then got a little upset because his skates were “Too fast and SLIPPERY”. Ha, roller-skates are pretty “slippery” :)


Well at least the sun is out right now... MELT SNOW!!!
I am having a lovely day!  Enjoy yours too :)

Sunday, April 4, 2010

Special Sale Today On.............

... this little sweety in my shop :)
Regular Price $22
Today for $17

Happy Easter!

Saturday, April 3, 2010

Rose Pillow Envy

I want some of these for my bed… and my couches… and wherever else I can stick them.


B.E.A.U.T.I.F.U.L
I think I am going to attempt a little DIY with these ideas this weekend :)

My brain is working on it now. I will definitely share if it turns out cute!! YAY so excited… I love feeling inspired!

Friday, April 2, 2010

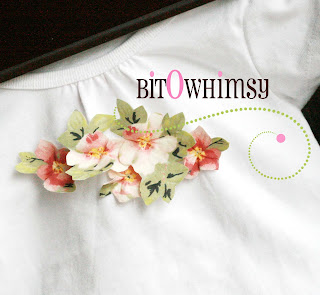
BLOOMIN FLOWER SHIRT Make N Take

It is my little niece’s birthday tonight. I wanted to make her something so I came up with this cute shirt to go with a skirt I made …. I have been feeling VERY crafty lately :) I thought it was a pretty cool idea, the flowers sort of POP out at you, so I photographed the steps as I made it. Hope you like it!


Supplies:
• T-Shirt
• Fabric with flowers in the design
• Fusible interfacing (the kind that irons to ONE side)
• Strong thread

1. Cut out around the flowers you are going to use and a piece of your interfacing to match. Iron the interfacing to the wrong of your fabric (this will make your flowers nice and srong)

2. Cut out your flowers.

3. Using a needle and some strong thread, sew a few stitches around the center of your flower (see first photo). Pull the thread to gather the center up (see second photo). That should make your pretty flower come to life :)  Tie off and repeat for each flower.

4. Decide how your want your flowers to be on your shirt and pin them down.

5. Tack each flower onto your shirt with a few stitches through the centers of them. This is what the inside of my shirt looked like when I was finished tacking the flowers down.


You're all done!
I made a "Bubble Skirt" to match. They are too cute, you can see how to make one HERE... she has a fabulous tutorial!
If I don’t post again this weekend I hope you all have a Hoppy Easter… ha ha so cheesy!