Showing posts with label inspiring ideas. Show all posts

Tuesday, February 14, 2012

Oh Valentines Day...

I have mixed feelings this V-day....
Happy, sad, silly, mad... let's leave it at that =) 

 I adore this day o' love partly for the decorating possibilities!  This has to be one of the funnest holidays to make and buy stuff for.  I love it! I got so much inspiration from Pinterest this year. 
In addition to my vintage valentine display, I whipped up these babies....

 I have to be honest.  I totally made them last night.  I had all the supplies for weeks and never got around to it.  I was DETERMINED to finish them, even if it was just for one day.  At first I hated them and I was going to quit.  I kept going and tweaking them a bit and now I love them.  I think the color combo is perfect too.  I wanted them to match the convo hearts in the jars. 

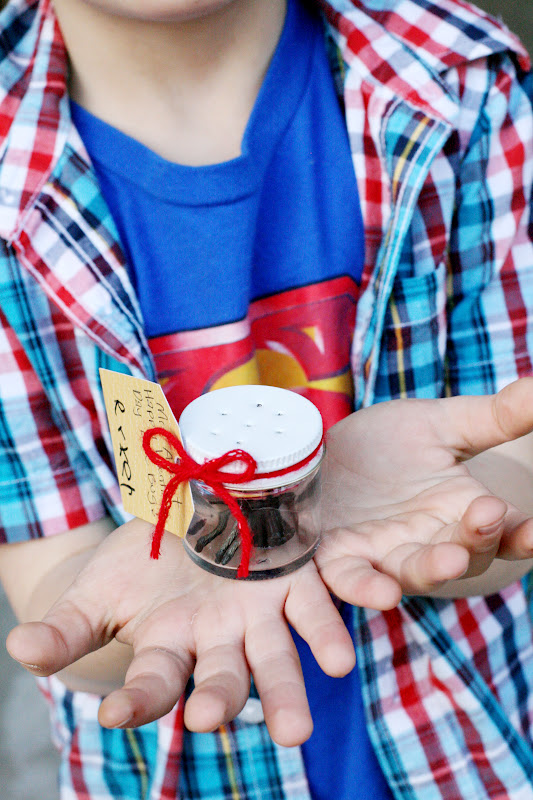
I found this darling valentine idea for my kiddo's classmates HERE.  Aren't they sweet little "love bug" cards!?  They were so quick and easy.  We even made his teacher a special valentine.  He said she hates spiders so we glued one in a jar and poked holes on the top to make it look real. 
 Hope your Valentines day was super sweet! XOXO

Friday, January 6, 2012

Our Elves Were Silly {Part 2}

In addition to what our elves did on THIS post, they also pulled these shenanigans  on us....

One morning the boys woke up to this note.  See photo below :)

Those crazy elves painted their noses like Rudolph while they were sleeping!

Hanging out in underwear, their were panties everywhere!

Nutcracker CRUNCH for Barnaby.

Making scarves with my yarn.

Silly face makeover.

Playing in the flour "snow".

This race track was all over the front room, along with every toy car we owned!

Nativity play along.

Christmas tree zip line.

Hope you all had a good laugh at Bernard and Barnaby... we sure did! 

Friday, October 7, 2011

Old School Pumpkin Project

My mom gave me these a few days ago.  I plan to paint them with an old fashioned faces.  I am not a painter so we will see how they turn out :)  I've been browsing around finding some inspiration.
Here is what I am thinking....


Right Source                                     Left Source 


Ok so some of those are a little creepy looking but you get the idea.  They will make the cutest Halloween decor if I can do the paint job right.  Cross your fingers for me!
I need to go come up with a birthday present for my niece now.. eek!

Wednesday, August 3, 2011

Gone Fishin' {Birthday Party}

I love, love loved this theme!  There were sooo many possibilities, I totally had to limit myself.  The plan was to have the party outside but due to wind and a little bit of rain we moved it inside.  I was so angry because right after the party started the weather was beautiful outside grrr
Here are the sweet details...
(imagine how awesome this would have all looked in the backyard grrr)
The decor! 
I took a trip to a couple thrift stores and scored most of the fishy decor there.  The green and blue fish I had to painted with good ole' acrylic paint to blend in better.  For the table tops I used pieces of flannel fabric.  In the centers of the tables I placed a jar or two that contained pebbles and real goldfish.  The little fishys were probably my favorite detail.  I wanted to put cattail stems in the jars as well but I couldn't find any outside before the party.  I made a cute "stringer" with cut out fish from scrapbook paper and hung it in the window.  I also put out my older boy's fish play set and "Go Fish" playing cards to entertain the guests.  This year we had the party catered too, it was such a good idea!
The cake!
The cake was a complete dream to make for once!!! No stress on this one.  I used three circle cake pans with different color batter in each.  In between each layer was orange marmalade... YUM!  The frosting recipe was from the back of a powder sugar package and it worked out perfect.  On the bottom I placed a row of Whoppers and Coco Pebbles.  The seaweed was made from green Fruit Roll-Ups.  I used different kinds of Goldfish to swim around the cake and edible pearls as their bubbles *magical*.  On the top of the cake I had a dock made from stick pretzels and sand from crushed Graham crackers.  As a finishing touch, I placed the cake on a stand made from a plate and a candle holder glued together.  It was so cute!
For the favor table we had a lot going on!  The signs were made from scrunched up and sanded scrapbook paper with kabob sticks glued to the back.  I packaged up bags of Goldfish and placed them in a tackle box labled "Catch of the Day".  We also had a bucket full of crushed up Oreos with gummy worms sticking out as our "Live Bait".  A smaller bucket held our feeder fish aka "Minnows".  We gave each guest a bag and let them load up!
Time for me to kick back and put up my feet!  I have until May of next year before I have to do another party :)  I hope you all like the details.  It sure was a blast.


Saturday, June 11, 2011

My friends are lucky!

Today I am going to a friends baby shower.  I went all out on this little guy.
Exhibit A:
 I have an obsession with matching :) Everything *must* flow.

The crochet goodies.  A Romeo hat, matching booties and a sweet little rabbit rattle... it doesn't really rattle but it was super cute ha!

I wish I could have shoes like these in the shop but the truth is they take SO much time, more than a hat if you can believe that.

This blanket is made from men's flannel shirts and backed with the softest stuff I could find.
I really love it and want to make one for my boys.  I saw the tutorial HERE and tweaked it a bit.  It is a great gift for little boys and somewhat fast/simple.
My mom did the entire trim for me, thanks Mom!


I used the scraps from the shirts to make these jammie pants.  The bottoms are made from the sleeve cuffs.
I can't wait to see her open it all!

Thursday, March 24, 2011

Braided

I'm not too adventurous when it comes to hair.  I tried out a bit of braiding the other day.  It wasn't very fancy but I really like it!  It was super fast to do too which is always a plus.
I watched a tutorial  and attempted to follow it.  I only used two strands of hair verses three so it isn't exactly like the video.  I pretty much dumbed it down a bit to my level ha ha.  Still, it turned out simple and cute!

Wednesday, January 26, 2011

Felt Flowers & Bum Covers

I made this pretty bouquet of flowers for a friend.  I had to share because I thought it was such a fabulous idea and it can fit into any theme.... "Get Well", "New Baby", "Sympathy", "Birthday", "Anniversary"... and so on.  Also, wouldn't they look SO pretty in red for Valentines Day??!! So many possibilities there. Here is the link for the HOW TO.
I finally took the time to photograph my up cycled diaper covers too!! They will be in the shop soon :)  Hopefully a few tonight after the kiddos are asleep. 
 Yay for their bedtime and my craft time :)

Tuesday, January 25, 2011

It's begining to look a lot like V-Day!

Hi hi!  I just wanted to share some pretties around our house these days. 
Last week I spent about 2 hours searching for a box I thought I had filled with v-day things and found nothing.  Then I was thinking about it and I realized I didn't really decorate last year.  Ha, that was a waste of time. 
So, I have been busy crafting and making decorations for the house.  Next year there WILL be a box filled with pink and red goodness :)  I haven't bought a single thing either... everything was already in my hands!!
 I went with the traditional red, pink and white color palate.  Here is what we have so far..........
We have a big open wall (no clue what you call this space) above our stairs to the basement that I have been using for decorating.  I was totally a copycat inspired by THIS post last year on one of my favorite blogs and stung a bunch of pretties in this space. 
On the Dear Lizzy Blog she directs you to THIS tutorial where you learn how to make the super sweet flower puffs you see here. They are made from coffee filters!!  Also, don't look to closely at my lights... they were from Christmas and were really green and ugly.  I threw some acrylic paint on to get them to blend in better.  I am not too sure how they are going to hold up in the years to come.

I bought a bunch of these blocks 3 years ago.  All they needed was some paint, a little sanding and some letter stickers.  I love it!

I embellished these cute stands with rosette covered Styrofoam balls.  They were super easy.  All you need to do is apply some hot glue directly to your foam ball and roll fabric strips around.  I used and old sheet, satin and some bumpy fabric.  The sheet worked best I think... just so you know :)

I started this little project last year.  I used painted scrapbooking hearts and simply glued some ribbon onto the backs to create my door deco.

Here we have some little hears stuck into our plant that I got last year on sale.. found these babies in the boys room and I am still searching for the white one I got.  The vase will be filled with something, not sure what yet.  I also have a little heart stand that we have been displaying Ryker's valentines in.  He makes them at preschool and brings home like 5 a day ha. 

I put a few lovey dovey scrapbook things out.   I use to be WAY into scrapbooking.  Both the mini book and the page are really old and work perfectly with my theme. 
 I have some red heart doilies and some vintage valentine cards I ordered the other day off Etsy that I can't wait to place around the house.
I hope you liked the peek inside my house and are feeling inspired! I am off to leave about 200 feedbacks on Etsy... yikes!!