Friday, December 31, 2010

Twelve Months of Moments in 2010

Goodbye to 2010.  Here are some memories my family will never forget.
January- We made West a silly hat and celebrated his half birthday.

February-  We got Ryker a new bed set and decorated the whole room with robots.

March-  I taught Ryker how to use my Cannon Rebel camera (photo by him).

April-  We went to the COLDEST Easter Egg Hunt ever.  I wore high heels because I am an idiot and I will never forget how bad my feet STUNG when the hunt was over and we were trying to warm up in the car.

May-  Welcomed my 8th niece Miss Adalee into the world.  I got to hold her shortly after she was born and felt so special :)

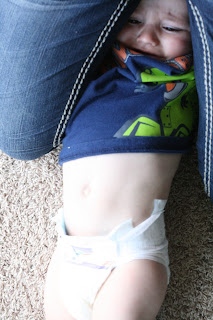
 June-  Began a diaper changing war with West that is still going on today.  If you can't make out the photo, those are my legs holding him down.  I have to sit on the kiddo... he is very strong.

July-  We turned the house into "Winner Ranch" and had a cowboy party for West.  I love these homemade mustaches.

August-  We took a quick trip to Thermopolis, Wyoming.  We Went to a dinosaur museum, swam in the hot springs, Ryker went off the high dive, and I gambled for the first time in my life. It was a blast!


September-  Went hunting for deer all day long.  We woke up at 3am and spent the entire day searching.  Just before dark and after we decided to call it quits we spotted our deer!

October-  Reunited with my little brother after 2 long years.  He came home from a church mission in Germany.

 November-  I kicked butt swam at the Roy High Alumni Swim Meet.  And oh yeah baby... I've still got it!

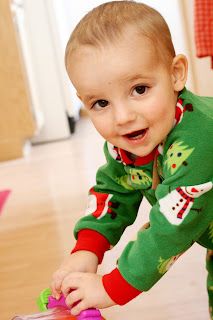
December-  We had ourselves a merry little Christmas :)

24 Hour BOGO Sale

I am celebrating the new year with a BOGO sale!!
Buy one item at regular price and receive your second item of equal or lesser value at half off!
Please note you will be issued your 50% refund via paypal after purchase has been made.  Be quick, this sale will only last 24 hours.
Happy 2011!

It Was Very Merry & Bright....

I know this is a little late but here is our Christmas details

 
We decorated... inside and out this year.  We got a real tree this year (my first real one ever).  It was beautiful and I already miss it.

We baked goodies for Santa... and ourselves :)

We talked about Jesus.

Ryker made a gingerbread house and West helped him destroy it.

We drank the yummiest coffee ever!!

 
We opened LOTS of presents.

We played with LOTS of presents.
To say the least it was very merry and bright :)
I hope yours was too! xo

Wednesday, December 8, 2010

A Couple Pretty Things

These two lovebirds are getting hitched tomorrow.  She is my bestie and has been since high school. I am so happy for them and so excited for the actual wedding!
I get to play dress up all day in a gorgeous dark purple dress and wear my hair in pretty curls :) I can't wait.  I wanted to share a couple cute things with you that I made... I have been EXTREMELY crafty this month

 I used this DIY shoe idea from Ana Paula at Get Craftin.... I always use her ideas.  She happened to be going to a wedding too. I got these shoes from Payless on sale for $10 and dolled them up with matching flowers and sparkly jewels.
I just hope they stay put the entire time!  I wish I had some shoe clips to put them on but I have no clue where to get something like that.  Any ideas??  Anyways, they were very simple - four layers of burnt edge circles stacked together and finished with jewels.  My feet are going to look quite chic!

I also made the bride some hair clips and bobbi pins for her honey moon.  She is going to a warm, sunny, tropical destination and I am totally jealous.  She let me have a peek at her vacation outfits and I whipped these babies up today to match. 
I hope she likes them.  I am loving the bright blue poppy clip and the pretty lace one.  I may have to make myself some. 
Wish me luck... I hope I don't trip while walking down the aisle!!

Wednesday, December 1, 2010

My Hats Are In A BOOK!!

The other day we were at Hastings browsing around at books and movies and I made an AMAZING discovery (to me anyways).  We were just about to leave when a cute baby in a cute hat caught my eye.  I recognized the photo on the cover because I had seen it before on the web.

  I got looking at the book a little closer and realize the book had tons of pictures form Tracy Raver... a very talented baby photographer.  I remembered she had purchased a few of my hats a while back so I started flipping threw the pages and I found TWO of my little hats pictured on the cutest little babies!  I was ecstatic of course and purchased the book.  Take a look..............
So so SO cool I think :)

Oh and in other news my shop was featured HERE  for Market Place Monday.
If you have a little shop you should definitely link up on Mondays.
What a great week so far.  Hope your week is going just as well.

Tuesday, November 30, 2010

Another Rolly Rosette

I thought I'd share another rosette made with red tulle.

I made the rose the same way I made THIS one and added two leaves.  I covered the leaves with a piece of felt and also added a clip.

TA DA.... a simple, pretty clip for the holidays :)

Monday, November 29, 2010

Rolly Rosette Make N Take

 
I have this cream shirt and in my opinion it is too plain.  It once had a silver plastic piece in the center but that broke off after a couple washes... figures.  I wanted add to this shirt and spice it up a bit so I came up with..... 
 THE ROLLY ROSETTE
This is the same type of rose that I have used in these "Pretty Pins" and the "Ella" headband.  Here is how to make them yourself!

You will need:
  • A few long strips of tulle or something similar (mine was like tulle but softer, I have no clue what it is called because like most of my fabric I found it at a thrift store)
  • A piece of felt that coordinates with your material
  • pearl beads
  • pin or clip
  • Hot Glue Gun
Cut your material about 1 to 2 inches wide and as long as you can. You might need a few of these depending on how big your rose is going to be. Also cut your felt into a circle about the size you want your rose to be.

Place drop of glue in the very center of your felt circle.  Attach your strip by sticking the end of your material down into the glue.

 Run the glue along the edges of your material and roll your piece around right on top.  I work with my fabric rolled in half so the cut edges are usually down in the glue and the fold is what you see on top. I like to set my glue close to my last row so I have lots of rows.

Continue with gluing and placing your material around and around and around and around :)

When you run out of material just glue your end down and glue a new strip on. 

I continue gluing the material down until the edges of my felt circle are covered for a clean finish. When you are ready to finish, simply cut the material off and glue down on the back.

 
So Pretty... almost done!

Add some more glue, the pearls and a pin or a clip to the back and your done.

I had to use two pins to get mine to stay where I wanted it just FYI :)
Happy Monday and happy crafting!
mmm button
The Girl Creative